🖥️How to Deploy This Bot in Hosting
Deploy bot in railway
Introduction
AutoForwards Bot is an open source project, anyone can develop it further, but before trying to develop it, it is good to know how to run this bot and how it works.
Note: Before doing clone there are several software that you must prepare, here is the software:
Tutorial Deploy in Railway
Step 1 - Fork Project to Your Repository Github
Fork is used to copy our repository into your github repository, therefore we recommend creating a github account first, you can register here. You can fork the TelegramBot-AutoForward repository via this link.
Step 2 - Prepare .env
.env is the development environment needed to run this TelegramBot-AutoForward project, previously we have prepared the .env file, just fill in the values
Open the .env file, which is located in the TelegramBot-AutoForward folder (which you have cloned)
there are several keys that must be filled with value
Note: to fill in the key, you can follow the tabs menu below.
NODE_ENV= <Fill in the development>
BOT_TOKEN= <obtained from BotFather, on telegram>
APPID= <obtained from mytelegram>
APPHASH=<obtained from mytelegram>
First step open, my.telegram.org.
fill in your phone-number in the form provided by telegram, if so click next.
You will be asked to enter a confirmation code, you can check your telegram, the code sent by the telegram, and paste it on the form provided, if so, press sign in.
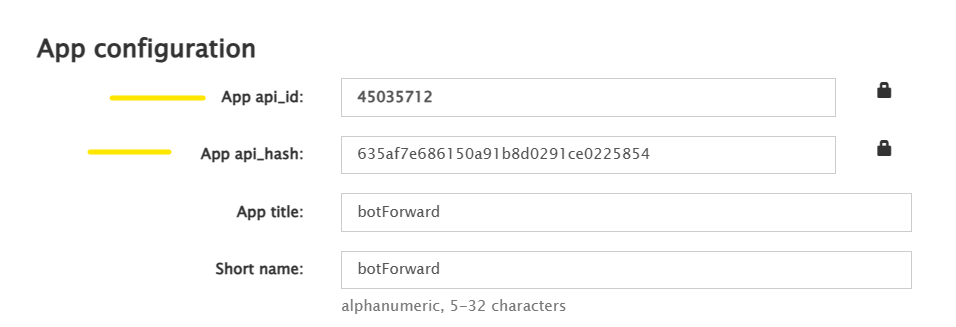
Click API development tools.
yey 🙌 You can copy the App api_id and App api_hash columns, don't forget to fill in the App title and short name according to the bot you created..
To get BOT_TOKEN, open your telegram visit BotFather, click on here.
Type
/startto view the list of commands.Type
/newbotto create a new bot.Then enter the name of the bot you want to create.
If so you will be given
BOT_TOKEN. 🙌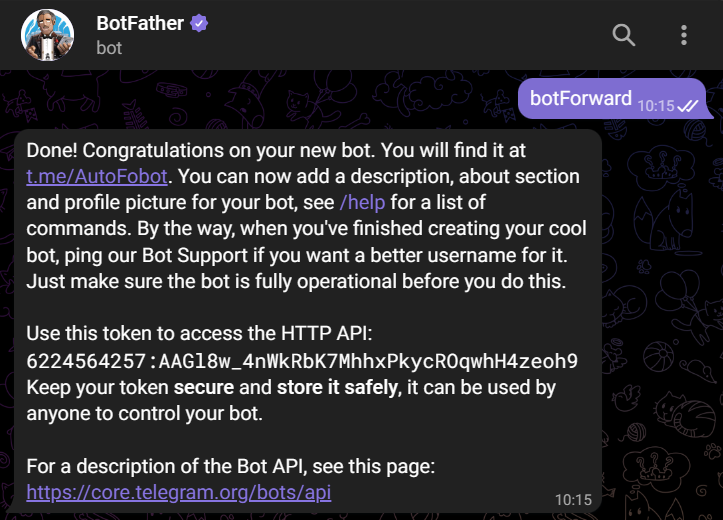
Membuat bot baru
If you have gotten all the codes and tokens, then fill in the .env file, according to the required values
Finish Step 2
Step 3 - Deploy to Railway
To deploy make sure you already have a railway account if not register first using github (required). if so please follow the tutorial below.
The first step you can fork the repository TelegramBot-AutoForward
Open website railway, then click dashboard (if you have registered)
Then click New Project,
Then click Deploy from Github repo, and find the repository that has forked, click it,
Then a new popup will appear, click add environment.
Then fill in the appropriate env in the previous Step 2, if so click add all,

Variables Page (set env requirements) If so, the Deployments tab will have a green active mark.
Then click Settings to configure the url generate,

Deployments Page (Server Actived) Then on the Networking menu, click generate domain,
Then copy the domain, open a new tab in the browser,
STEP 4 - Set Webhook
Webhook is a software architecture that allows applications to perform a task automatically after being triggered by certain conditions (events), and it has been handled by telegram, developers only need to use it, here is how to set up a webhook so that messages can be forwarded in real time.
After getting the domain url from the railway, copy the webhook url that telegram has, and set it according to the command below
https://api.telegram.org/bot<bot_token>/setWebhook?url=<webhook_url>, replace bot_token with your bot token, and webhook_url with the link copied from railway above. An example is below,Finish.

Successfully set webhook After setting up the webhook, it is expected to restart the railway by, on the Deployments tab, clicking the three-point mark at the end of the line, and clicking restart.

Restart Railway Server
Set Webhook
to set a webhook can be done with this url https://api.telegram.org/bot<bot_token>/setWebhook?url=<webhook_url>
Example: https://api.telegram.org/bot641868315735:AAGu8gJQrNjuFdwgWweW2WH0hQisRkQwRww/setWebhook?url=telegrambot-autoforward-production-87f2.up.railway.app
Note:
To deploy to another Platform as a Service (PaaS) hosting, the method above is almost exactly the same, but there must be adjustments, you can follow step 1, step 2, step 4. Step 3 you adjust to your hosting platform.
Last updated